Water Heater Leaking From Bottom: Causes and Fixes 2026

Water Heater Leaking From Bottom: Causes and Fixes 2026

Finding a pool of water at the base of your appliance can be a stressful experience. A water heater leaking from bottom is a common household issue that varies in severity from a simple loose connection to a complete tank failure. Identifying the source of the leak quickly is essential to prevent extensive water damage to your flooring and surrounding structures.

Most homeowners assume that a leak at the bottom means the entire unit needs to be replaced. While this is sometimes true, many leaks originate from specific components that are easily repairable or replaceable. Understanding the mechanics of your water heater will help you communicate better with a plumber or even handle the repair yourself if you are handy with tools.

In this guide, we will walk through the systematic process of diagnosing a water heater leaking from bottom. We will explore the most frequent culprits, provide step-by-step instructions for troubleshooting, and offer maintenance tips to ensure your unit remains efficient for years to come. By the end of this article, you will know exactly how to handle this plumbing emergency.

Initial Assessment of the Leak Source

Water Heater Wet Floor
Foto oleh Sora Shimazaki di Pexels

Confirming the Leak Location

Before jumping to conclusions, you must verify where the water is actually coming from. Sometimes, water can leak from the top of the heater and run down the sides, making it look like a bottom leak. Use a flashlight to inspect the top connections, the cold water inlet, and the hot water outlet pipes carefully.

If the top of the tank is completely dry, then the issue is likely localized to the bottom half. Wipe away the existing puddle and place paper towels around the base. Watch closely to see where the moisture first appears. This simple step can save you hours of unnecessary work by pinpointing the exact component that is failing.

Differentiating Between Condensation and Leaks

It is possible that the water you see is not a leak at all but rather condensation. This often happens when a large amount of cold water enters a hot tank, or if the unit is located in a humid basement. Condensation is usually a thin film of water rather than a steady drip or a puddle.

To test for this, wipe the area dry and monitor it for a few hours without using hot water. If the water does not return, or only returns when the unit is working hard to heat a full tank of cold water, you may simply need to improve the ventilation in the room or insulate the pipes.

Checking the Drain Valve

The drain valve is located near the bottom of the tank and is used for flushing the unit. Over time, the internal seals can degrade, or sediment can prevent it from closing completely. This results in a slow but persistent drip that pools at the bottom of the heater.

Check the nozzle of the drain valve for moisture. If you see water dripping from the opening, the valve might just be loose or dirty. If water is seeping from the threads where the valve enters the tank, the seal itself may have failed. This is one of the most common causes of a water heater leaking from bottom.

Troubleshooting the Temperature and Pressure Relief Valve

Pressure Valve Plumbing Pipe
Foto oleh 夜 咔罗 di Unsplash

Understanding the T&P Valve Function

The Temperature and Pressure (T&P) relief valve is a critical safety component designed to release water if the internal pressure or temperature becomes too high. It usually has a discharge pipe that runs down the side of the tank toward the floor. If this valve is triggered, water will exit the pipe and pool at the bottom.

If you see water coming from the discharge pipe, it means the valve is doing its job or it has become faulty. A valve that triggers frequently might indicate that your thermostat is set too high or that your home has excessive water pressure. However, a faulty valve can also leak if it gets stuck in a slightly open position.

Testing the Valve for Failure

You can manually test the T&P valve by lifting the small lever on top of it. This should release a burst of water into the discharge pipe. When you let go, the flow should stop immediately. If the valve continues to drip after you have closed the lever, it is likely defective and needs replacement.

Be extremely careful when performing this test, as the water released will be scalding hot. Always ensure the discharge pipe is securely attached and aimed toward a safe area or a floor drain before lifting the lever. If no water comes out at all, the valve is clogged and must be replaced immediately for safety reasons.

Replacing a Faulty T&P Valve

Replacing this valve is a relatively straightforward task for a DIY enthusiast. You will need to turn off the power or gas, shut off the water supply, and drain the tank until the water level is below the valve. Once the tank is partially empty, you can unscrew the old valve using a pipe wrench.

When installing the new valve, apply teflon tape to the threads to ensure a watertight seal. Screw it in firmly, reattach the discharge pipe, and refill the tank before turning the power back on. Always check for leaks around the new connection after the tank has reached its full operating temperature.

Addressing Drain Valve Leaks and Maintenance

Garden Hose Wrench
Foto oleh Swati Kedia di Unsplash

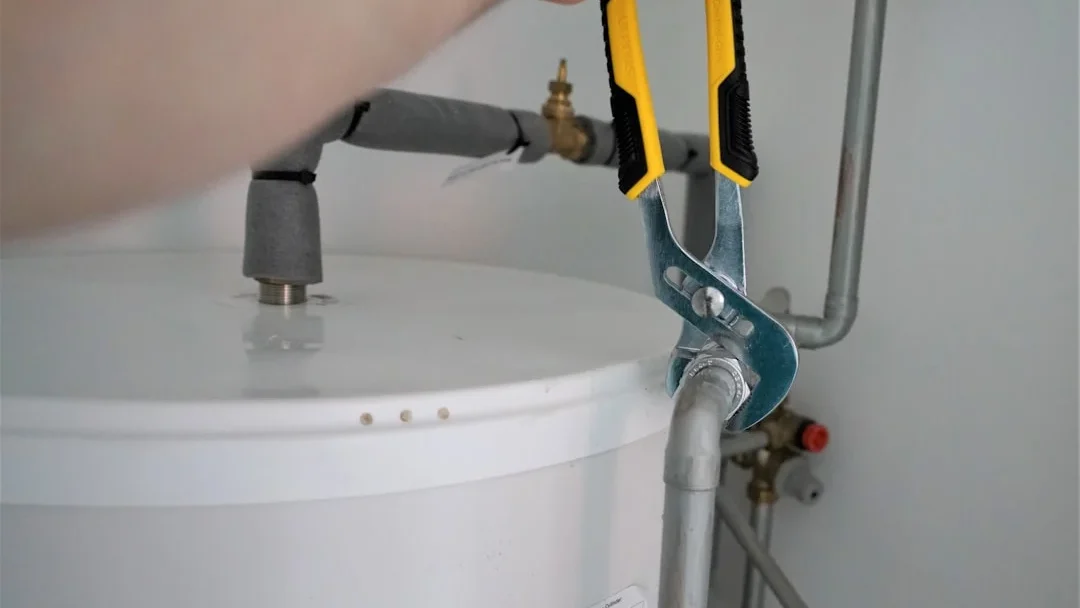
Tightening a Loose Drain Valve

Sometimes, the solution to a water heater leaking from bottom is as simple as tightening the drain valve. These valves are often made of plastic or brass and can loosen over time due to thermal expansion and contraction. Use a wrench to gently turn the valve clockwise to see if it tightens.

Do not use excessive force, especially if the valve is made of plastic, as you could crack the housing or strip the threads. If tightening does not stop the leak, the internal washer may be damaged or there may be sediment buildup preventing a proper seal.

Flushing Sediment to Stop Drips

Sediment like calcium and magnesium can settle at the bottom of the tank and get caught in the drain valve when you try to close it. This prevents the valve from seating correctly. To fix this, attach a garden hose to the valve and run the other end to a drain.

Open the valve for a few seconds to let a high-pressure stream of water flush out any debris. Close the valve and check if the leaking stops. This systematic flushing not only fixes minor leaks but also improves the energy efficiency of your heater by removing the insulating layer of sediment at the bottom.

Installing a Brass Replacement Valve

If the original plastic drain valve is cracked or permanently leaking, it is highly recommended to replace it with a high-quality brass drain valve. Brass is much more durable and resistant to the high temperatures and pressures found inside a water heater. This upgrade can prevent future leaks at the bottom of the unit.

The replacement process involves draining the tank completely. Once empty, unscrew the old valve and clean the threads on the tank. Apply pipe sealant or teflon tape to the new brass valve and install it securely. This is a permanent fix that provides better reliability than the factory-installed plastic versions.

Internal Tank Corrosion and Structural Failure

Rusty Water Metal Tank
Foto oleh BldrJanet di Pixabay

Signs of an Internal Tank Leak

If you have checked the valves and they are dry, but water is still seeping from the bottom jacket of the heater, the internal tank itself may be leaking. This is usually caused by corrosion eating through the steel walls of the tank. One clear sign of this is seeing rusty or discolored water in the puddle.

Internal leaks are often hidden behind the outer insulation and metal casing. You might see water dripping from the very bottom rim of the heater or through the combustion chamber (in gas models). Unfortunately, if the internal tank is breached, there is no way to repair it, and the entire unit must be replaced.

The Role of the Anode Rod

Every tank water heater contains a sacrificial anode rod. Its job is to attract corrosive elements in the water so that the rod corrodes instead of the steel tank. If the anode rod is completely depleted, the corrosive elements will begin to attack the tank walls, leading to a water heater leaking from bottom.

Homeowners should check the anode rod every 2 to 3 years. If the rod is thin or the wire core is visible, it should be replaced. Regular replacement of the anode rod is the single most effective way to prevent the structural failure that leads to bottom leaks and premature tank replacement.

Why Corrosion Happens Faster

Several factors can accelerate tank corrosion. Hard water with high mineral content is particularly aggressive. Additionally, if your water pressure is consistently above 80 PSI, it puts constant stress on the tank welds. Using a water softener can help, but be aware that softened water can actually make the anode rod deplete faster, requiring more frequent inspections.

Another common cause is galvanic corrosion, which occurs when two different metals (like copper pipes and steel tanks) are joined without a proper dielectric union. Ensuring your plumbing connections are installed correctly can significantly extend the life of your water heater and prevent leaks at the base.

Safety Steps When You Discover a Leak

Circuit Breaker Water Valve
Foto oleh Jorge Avila di Unsplash

Disconnecting the Power Supply

Safety should be your first priority when dealing with a water heater leaking from bottom. Water and electricity are a dangerous combination. If you have an electric water heater, go to your circuit breaker panel and turn off the power to the unit immediately. This prevents the risk of electric shock and protects the heating elements from burning out if the tank empties.

For gas water heaters, turn the gas control valve to the “Off” or “Pilot” position. This prevents the burner from igniting while you are working on the unit or if the water level drops too low. Never attempt to repair a leaking heater while the power or gas is still active.

Shutting Off the Water Supply

To stop the leak from getting worse, you need to stop the flow of water into the tank. Locate the cold water shut-off valve, which is usually found on the pipe entering the top of the heater. Turn the handle clockwise to close it. If the valve is a lever-style ball valve, turn it 90 degrees so it is perpendicular to the pipe.

If the shut-off valve on the heater is stuck or leaking itself, you may need to turn off the main water supply to the entire house. Stopping the incoming pressure will significantly slow down or stop the leak at the bottom, giving you time to assess the situation without causing more floor damage.

Draining the Tank Safely

If the leak is significant, you should drain the tank to remove the weight and pressure. Attach a hose to the drain valve and lead it to a floor drain or outside. Open a hot water faucet somewhere in the house to allow air into the system, which helps the tank drain faster.

Keep in mind that the water coming out will be very hot. Use heat-resistant gloves and ensure the hose is securely fastened. Draining the tank is a necessary step whether you are replacing a valve or preparing the unit for a full replacement by a professional plumber.

Professional Help vs. DIY Repair

Plumber Toolbox
Foto oleh Kindel Media di Pexels

When to Call a Professional Plumber

While some repairs like replacing a valve are manageable for a DIYer, other situations require a professional. If you are uncomfortable working with gas lines or high-voltage electricity, it is always safer to call a licensed plumber. Gas leaks or improper wiring can lead to catastrophic results.

Additionally, if the leak is coming from the internal tank, a professional can confirm the diagnosis and provide a quote for a new installation. They have the tools to safely remove the old unit and ensure the new one is installed according to local building codes, which often include requirements for expansion tanks and proper venting.

The Benefits of Professional Diagnosis

A professional plumber can use specialized tools like pressure gauges and thermal cameras to find hidden leaks. They can also check your home’s overall water pressure to see if an underlying issue is causing your water heater to fail prematurely. Sometimes, what looks like a bottom leak is actually a complicated issue with the internal flue or venting system.

Hiring a pro also gives you peace of mind with warranties on labor and parts. If a DIY repair fails, you are responsible for the damage. If a professional installation has an issue, the company is usually obligated to fix it at no additional cost to you.

Cost Considerations for Repairs

The cost of fixing a water heater leaking from bottom varies. A simple valve replacement might cost between $100 and $300 including labor. However, if the tank is corroded, a full replacement can range from $800 to $2,500 depending on the size and type of the unit (standard vs. tankless).

Consider the age of your water heater when deciding whether to repair or replace. Most tank heaters last 8 to 12 years. If your unit is over 10 years old and has a leak, investing in a repair may only be a temporary fix. In such cases, replacing the unit is often the more cost-effective long-term solution.

Preventive Maintenance to Avoid Future Leaks

Annual Tank Flushing Routine

The best way to prevent a water heater leaking from bottom is to perform an annual flush. This process removes the sediment that causes the bottom of the tank to overheat and corrode. It also keeps the drain valve clear of debris, ensuring it can close tightly when needed.

To flush the tank, simply turn off the heater, attach a hose to the drain valve, and let the water run until it comes out clear. This simple 15-minute task can add years to the lifespan of your appliance and prevent the common causes of bottom leaks mentioned earlier.

Monitoring Water Pressure and Temperature

High water pressure is a silent killer of water heaters. If your home’s pressure is above 80 PSI, install a pressure reducing valve (PRV) to protect your plumbing. Excessive pressure causes the tank to expand and contract violently, leading to cracks in the glass lining and eventual leaks.

Similarly, keeping your temperature at the recommended 120 degrees Fahrenheit (49 degrees Celsius) reduces the rate of mineral buildup and internal pressure. Higher temperatures accelerate corrosion and put unnecessary strain on the T&P relief valve, increasing the likelihood of a leak.

Installing a Leak Detection Alarm

For added peace of mind, consider installing a smart leak detector near the base of your water heater. These small, battery-operated devices sit on the floor and sound a loud alarm the moment they detect moisture. Some models can even send an alert to your smartphone.

Early detection is the key to preventing a small drip from becoming a flooded basement. By catching a water heater leaking from bottom in its earliest stages, you can address the problem before it causes structural damage or requires an emergency after-hours plumbing call.

Conclusion

A water heater leaking from bottom is an issue that requires a systematic approach to diagnose and fix. By checking the drain valve, the T&P relief valve, and the internal tank for corrosion, you can determine whether you are facing a minor repair or a full replacement. Remember that safety is paramount; always turn off the power and water before attempting any inspections or repairs.

Regular maintenance, such as flushing the tank annually and replacing the anode rod, is the most effective way to prevent leaks and extend the life of your unit. While some tasks are suitable for a DIY approach, do not hesitate to contact a professional if the leak involves the internal tank or if you are uncomfortable with gas and electrical systems.

Ultimately, being proactive about your water heater’s health will save you money and prevent the headache of unexpected water damage. Keep these tips in mind, and you will be well-prepared to handle any drips or puddles that appear at the base of your appliance.

Expert 24 Hour Water Heater Repair Services 2026

Expert 24 Hour Water Heater Repair Services 2026

Waking up to an ice-cold shower or discovering a pool of water in your basement is a stressful experience that usually happens at the most inconvenient times. Whether it is the middle of the night or a holiday weekend, a malfunctioning water heater requires immediate attention to restore comfort and prevent further damage to your home. This is where professional 24 hour water heater repair services become essential for modern homeowners.

When a water heater fails, it is not just about the loss of hot water for bathing and cleaning. Certain issues, such as gas leaks or major tank ruptures, can pose serious safety risks to your family and property. Understanding how to identify these emergencies and knowing who to call can make the difference between a quick fix and a costly disaster. In this guide, we will explore everything you need to know about navigating emergency plumbing situations.

Finding a reliable technician who can respond at any hour is the first step toward reclaiming your home’s functionality. By focusing on prompt action and expert diagnostics, you can ensure that your system is back up and running with minimal downtime. Let us dive into the specifics of identifying, managing, and preventing water heater emergencies in 2026.

Identifying True Water Heater Emergencies

Water Heater Leak
Foto oleh Uğur Hamzayev di Pexels

Water Leaking from the Tank

One of the most obvious signs that you need 24 hour water heater repair is a visible leak coming from the main tank. If you notice water pooling at the base of the unit, it could indicate a crack in the internal lining or a failed seal. Because a leaking tank can quickly escalate into a flood, it is considered a high-priority emergency that requires a professional to assess whether a repair or a full replacement is necessary.

Ignoring a small leak can lead to mold growth and structural damage to your flooring and walls. In many cases, a leak from the bottom of the tank suggests that the metal has corroded through, meaning the unit is nearing the end of its lifespan. A technician can determine if the leak is coming from a replaceable valve or the tank itself.

Foul Smells or Discolored Water

If your hot water suddenly looks rusty, brown, or cloudy, it is a sign of significant trouble inside the unit. Discolored water often indicates that the interior of the tank is rusting or that there is a heavy accumulation of sediment. This not only affects the quality of your water but can also lead to blockages in your pipes and fixtures if not addressed immediately.

Similarly, a “rotten egg” smell coming from your hot water taps usually points to a bacterial infestation or a failing anode rod. While this might not seem like a physical emergency, it impacts the safety and usability of your water supply. A 24-hour service can flush the system and replace the necessary components to restore clean water to your household.

Strange Noises During Operation

Modern water heaters should operate relatively quietly. If you start hearing loud popping, banging, or rumbling sounds coming from the utility closet, it is a clear indicator of sediment buildup. As minerals settle at the bottom of the tank, they trap water underneath them; when the burner ignites, the water boils and “pops” through the sediment layer.

These noises are more than just an annoyance; they signal that your heater is working harder than it should, which can cause the tank to overheat and eventually fail. A technician can perform a professional flush to remove the debris and check for any permanent damage caused by the overheating process.

Total Loss of Heating Capability

A complete lack of hot water is the most common reason homeowners seek emergency assistance. This can be caused by various factors, including a tripped circuit breaker, a blown fuse, or a failed heating element in electric models. For gas units, the culprit might be a faulty thermocouple or a pilot light that refuses to stay lit.

When you have a large family or a busy schedule, waiting days for a repair is not an option. Emergency technicians carry the necessary diagnostic tools to quickly identify the source of the power or fuel failure. They can often replace the broken component on the spot, ensuring you have hot water before the next morning.

Common Mechanical Issues Requiring Immediate Action

Failing Heating Elements

Electric water heaters typically rely on two heating elements to warm the water. If one of these elements burns out, you might find that your water is lukewarm rather than hot, or that you run out of hot water much faster than usual. When both elements fail, you will be left with only cold water.

Replacing a heating element involves draining a portion of the tank and working with high-voltage electrical connections. Because of the complexity and the risk of electric shock, this is a task best left to 24 hour water heater repair experts who can ensure the new element is installed safely and correctly.

Broken Thermostats

The thermostat is the brain of your water heater, telling it when to turn on and off. If the thermostat malfunctions, it might stop the heater from turning on entirely, or worse, it might fail to turn the heater off. The latter can cause the water to reach scalding temperatures, which is a major safety hazard for children and the elderly.

Technicians use specialized multimeters to test the continuity of the thermostat. If it is found to be defective, they can replace it with a compatible model. Ensuring your thermostat is calibrated correctly is vital for both safety and energy efficiency in your home.

Faulty Pressure Relief Valves

The Temperature and Pressure (T&P) relief valve is a critical safety feature designed to release water if the internal pressure of the tank gets too high. If this valve starts leaking constantly or becomes stuck, the tank is at risk of exploding under extreme pressure. This is a rare but catastrophic event that can be prevented with a simple valve check.

An emergency plumber will inspect the T&P valve to ensure it is functioning. If the valve is dripping, it may just need to be cleared of debris, or it may need a total replacement. Never attempt to plug or cap a leaking T&P valve, as this removes the safety “fail-safe” for the entire system.

Pilot Light and Ignition Problems

For those with gas-powered systems, the pilot light is a frequent source of frustration. If the pilot light goes out, the burner will not ignite, and the water will remain cold. While some homeowners feel comfortable relighting it themselves, a pilot light that repeatedly goes out usually indicates a faulty thermocouple or a clogged pilot tube.

Gas-related issues should always be handled with extreme caution. If you smell gas near your water heater, you should immediately exit the building and call for emergency help. A professional will check for gas leaks and ensure the ignition system is safe for continued use.

Advantages of Hiring 24 Hour Repair Specialists

Plumber Service Van
Foto oleh Pavel Danilyuk di Pexels

Availability During Holidays and Weekends

Plumbing emergencies do not follow a standard work schedule. Many standard plumbing companies are closed on Sundays or during major holidays, leaving homeowners in a lurch. A 24 hour water heater repair service ensures that help is available 365 days a year, regardless of the time.

This availability is particularly important during the winter months when a lack of hot water can be more than an inconvenience—it can be a health risk. Having a dedicated emergency team on call means you never have to suffer through a freezing weekend without the basic necessity of hot water.

Access to Specialized Tools and Parts

Emergency repair specialists often keep their service vehicles stocked with a wide array of common replacement parts, such as thermostats, elements, and valves. This allows them to complete most repairs in a single visit, rather than making you wait for a part to be ordered from a warehouse.

Furthermore, these professionals use high-grade diagnostic equipment that can pinpoint hidden issues, such as internal corrosion or electrical shorts. Their expertise allows them to work efficiently, saving you time and potentially preventing the need for a full unit replacement.

Reduced Risk of Secondary Water Damage

When a water heater fails, the damage is often not confined to the unit itself. Water can seep into drywall, ruin carpets, and cause wood rot in the flooring. By calling for 24 hour water heater repair the moment you notice a problem, you significantly limit the amount of time water has to cause damage to your home.

A professional can quickly shut off the water supply and drain the tank safely, containing the mess. They can also provide advice on how to dry out the area to prevent long-term issues like mold and mildew, which can be much more expensive to remediate than the initial plumbing repair.

Immediate Safety Measures for Homeowners

Valve Circuit Breaker
Foto oleh LH985 di Pixabay

Shutting Off the Power Supply

If you suspect your water heater is malfunctioning, the first step is to cut the power. For electric water heaters, locate your home’s main electrical panel and flip the breaker dedicated to the water heater to the “off” position. This prevents the heating elements from burning out if the tank is empty and eliminates the risk of electrical shock if there is a leak.

For gas heaters, turn the dial on the gas control valve to the “off” or “pilot” position. This stops the burner from firing up. Taking these steps immediately can prevent a minor mechanical issue from turning into a dangerous electrical or fire hazard while you wait for the technician to arrive.

Closing the Main Water Valve

If you see water leaking from the tank, you must stop the flow of new water into the unit. Locate the cold water shut-off valve, which is usually found on the pipe leading into the top of the water heater. Turn this valve clockwise until it stops. If the valve is a lever style, turn it so it is perpendicular to the pipe.

Stopping the water flow minimizes the amount of flooding in your home. If the leak is severe and you cannot reach the valve on the water heater safely, you may need to turn off the main water supply to the entire house. Knowing where these valves are located before an emergency happens is a key part of responsible homeownership.

Managing Gas Line Safety

If you have a gas water heater and you smell a distinct “rotten egg” odor, you may have a gas leak. In this situation, do not turn any lights on or off, do not use your phone inside the house, and do not attempt to find the leak yourself. These actions can create a spark that might ignite the gas.

Immediately evacuate everyone from the home and call your local gas company or emergency services from a safe distance. Once the gas company has cleared the area, you can then contact a 24 hour water heater repair service to fix the underlying issue with the unit’s gas connection or control valve.

Understanding the Repair Process

Technician Flashlight
Foto oleh Artem Podrez di Pexels

Initial Inspection and Diagnosis

When the emergency technician arrives, their first priority is to perform a thorough inspection. They will look for signs of external damage, check all electrical or gas connections, and test the functionality of the thermostat and heating elements. This diagnostic phase is crucial for determining whether a simple repair will suffice or if the unit has reached the end of its life.

The technician will also check the age of the unit. Most water heaters last between 8 and 12 years. If your unit is within this range and experiencing a major failure, the professional might discuss the pros and cons of repairing versus replacing the system to ensure you make an informed financial decision.

Explanation of Required Parts

After the diagnosis, the technician should provide a clear explanation of what went wrong and what parts are needed to fix it. A reputable 24 hour water heater repair service will offer a transparent quote before they begin any work. This ensures there are no surprises when the final bill arrives.

They will explain how the new part functions and why the old one failed. For example, if a heating element failed due to sediment buildup, they might recommend a tank flush in addition to the part replacement. This educational approach helps you understand how to better care for your system in the future.

Testing the System After Repair

Once the repair is completed, the technician will not just pack up and leave. They will refill the tank, restore power or gas, and wait to ensure the water is heating correctly. They will also double-check all connections for leaks and test the safety valves to confirm the unit is operating within safe parameters.

This final testing phase provides you with the peace of mind that the issue is truly resolved. The technician will often provide a brief summary of the work performed and any warranties associated with the new parts or labor, giving you a record of the service for your home maintenance files.

Cost Factors for Emergency Service

Invoice Calculator
Foto oleh Cobanams di Pixabay

After-Hours Labor Rates

It is important to be aware that 24 hour water heater repair services often come with a higher labor rate than standard business hour appointments. This “emergency fee” covers the cost of having technicians on standby and available at a moment’s notice. While the initial cost is higher, the savings in terms of prevented water damage often outweigh the premium.

When you call for service, ask about their emergency dispatch fee. Some companies offer flat-rate pricing, while others charge by the hour. Knowing the pricing structure upfront helps you manage your expectations and budget for the unexpected expense.

Complexity of the Specific Issue

The type of repair needed significantly impacts the final cost. Replacing a simple thermocouple or a thermostat is generally much more affordable than replacing a main control valve or multiple heating elements. If the repair requires extensive labor, such as draining a large tank or accessing a unit in a tight crawlspace, the labor costs will increase accordingly.

In some cases, the technician may find that the tank is structurally compromised. If a replacement is necessary, the cost will include the new unit, delivery, installation, and the disposal of the old heater. Emergency services can often provide a temporary fix to get you through the night if a full replacement cannot be done immediately.

Regional Service Fees

Costs can also vary based on your geographic location. In major metropolitan areas, service fees might be higher due to increased overhead and travel times. Conversely, in rural areas, you might pay more for the technician’s travel distance. Regardless of location, it is always best to choose a licensed and insured professional to ensure the job is done right.

Many homeowners insurance policies cover certain types of water heater failures, especially if they result in water damage. It is worth checking your policy to see if you can be reimbursed for a portion of the emergency repair costs. Keep all receipts and documentation provided by the repair service for your insurance claim.

Preventing Future Breakdowns

Regular Tank Flushing

The best way to avoid a 24 hour water heater repair call is to perform regular maintenance. Flushing your water heater tank at least once a year removes the sediment that causes overheating and element failure. This simple process involves connecting a garden hose to the drain valve and letting the water run until it is clear.

Regular flushing not only extends the life of your heater but also improves its efficiency. When the heating element does not have to work through a layer of sludge, it uses less energy to heat the water, resulting in lower monthly utility bills for your household.

Replacing the Anode Rod

Inside every tank water heater is a sacrificial anode rod. Its job is to attract corrosive elements in the water so that they attack the rod instead of the steel tank. Over time, the rod dissolves. If you do not replace it every 3 to 5 years, the tank will begin to rust from the inside out.

A technician can quickly check the condition of your anode rod during a routine maintenance visit. Replacing a worn rod is an inexpensive way to add years to the life of your water heater and prevent the catastrophic leaks that lead to emergency service calls.

Monitoring the Pressure Valve

You should periodically test the Temperature and Pressure (T&P) relief valve to make sure it is not stuck. Simply lift the lever briefly to let a small amount of water out, then let it snap back. If water continues to drip, the valve needs to be replaced. If no water comes out, the valve is clogged and dangerous.

By keeping an eye on this safety device, you ensure that your heater can handle pressure fluctuations without risk. This is a quick check that any homeowner can perform, though you should be careful as the water released will be very hot.

Professional Tune-Ups

Scheduling a professional inspection once a year is the ultimate preventative measure. A plumber can check for minor leaks, inspect the venting system on gas units, and ensure all electrical components are in good condition. They can often spot a potential problem months before it turns into an emergency.

Many 24 hour water heater repair companies offer maintenance plans that provide discounted inspections and priority service. Investing in a tune-up in 2026 can save you the stress and expense of a midnight plumbing crisis later in the year.

Conclusion

Dealing with a water heater failure is never easy, but having access to 24 hour water heater repair services ensures that you are never left without help. By understanding the common signs of trouble—such as leaks, strange noises, and discolored water—you can act quickly to minimize damage and restore your home’s hot water supply. Remember that safety should always be your top priority; shutting off power and water at the first sign of a leak is a crucial step for every homeowner.

While emergency repairs are a lifesaver, the value of preventative maintenance cannot be overstated. Regular tasks like flushing the tank and checking the anode rod are simple investments that pay off in the form of a longer-lasting, more efficient system. By staying proactive and knowing which professional to call, you can navigate any water heater issue with confidence and ease.

In summary, keep the following tips in mind to handle water heater issues effectively:

  • Know the location of your water and power shut-off valves for the heater.
  • Never ignore small leaks or unusual sounds, as they always escalate.
  • Always hire licensed professionals for 24-hour repairs to ensure safety and quality.
  • Maintain a regular service schedule to prevent future emergencies in 2026.
No Hot Water in House? Causes and Fixes for 2026

No Hot Water in House? Causes and Fixes for 2026

Stepping into a shower only to be met with an icy blast of water is a jarring experience that no homeowner enjoys. It is a common household frustration that often occurs at the most inconvenient times, such as early in the morning or during a cold winter day. When there is no hot water in house, it disrupts your daily routine, from bathing to washing dishes and doing laundry.

The cause of this problem can range from a simple tripped circuit breaker to more complex issues like a failing heating element or a pilot light that has gone out. Understanding the mechanics of your water heating system is the first step toward a quick and effective solution. Fortunately, many of these issues can be diagnosed and even fixed without the immediate need for an expensive service call.

In this guide, we will walk you through a systematic approach to troubleshooting your water heater. We will cover gas and electric systems, tankless units, and common maintenance tasks that can prevent these issues from recurring. By following these clear steps, you can identify the source of the problem and decide whether it is a DIY fix or a job for a professional plumber.

Identifying the Source of the Problem

Checking Multiple Fixtures

The first step in troubleshooting is to determine if the lack of hot water is affecting the entire house or just one specific area. Go to different sinks and showers throughout your home and turn on the hot water tap. If you find that hot water is available in the kitchen but not in the master bathroom, the issue is likely related to a specific faucet or a localized pipe problem rather than the water heater itself.

If every fixture in the house is running cold, then the problem is definitely centralized at the water heater. This helps narrow down your search and prevents you from wasting time on the wrong components. For instance, a single cold shower might just need a new mixing valve, whereas a house-wide outage points to the main heating unit.

Inspecting for Visible Leaks

Walk over to your water heater and perform a visual inspection of the area around the base of the tank. Look for any puddles, damp spots, or signs of corrosion on the tank itself. A leaking tank is a serious issue that often indicates the internal lining has failed, which usually means the entire unit needs to be replaced immediately to avoid water damage.

Check the connections at the top of the water heater as well. Sometimes, a leak can start at the inlet or outlet pipes and drip down, making it look like the tank is failing when it is actually just a loose fitting. Tightening these connections or replacing a small section of pipe is much more affordable than replacing the whole heater.

Testing Water Pressure

Low water pressure combined with a lack of heat can indicate a blockage in the lines or a problem with the main water supply. If the water is barely trickling out of the hot side of the tap, there might be a shut-off valve that has been partially closed or a significant buildup of sediment inside the pipes.

Ensure that the cold water supply valve leading into the water heater is fully open. If this valve is restricted, the heater cannot push hot water out to the rest of the house. In some cases, a pressure reducing valve in your home plumbing system may have failed, affecting the flow of water to the heating unit.

Troubleshooting Gas Water Heaters

Gas Valve Pilot Light
Foto oleh Chikilino di Pixabay

Relighting the Pilot Light

If you have a gas water heater, the most common reason for having no hot water in house is a pilot light that has gone out. Drafts, a sudden change in gas pressure, or a dirty burner can cause the flame to extinguish. Most modern gas heaters have a clear set of instructions printed on the side of the tank explaining how to safely relight the pilot.

Typically, you will need to turn the gas knob to the pilot position, press it down, and use the igniter button or a long lighter to spark the flame. Once the pilot is lit, continue holding the knob for about 60 seconds to allow the thermocouple to heat up. If the light goes out as soon as you release the knob, the thermocouple may be faulty and need replacement.

Checking the Gas Supply

Sometimes the issue is not the heater itself but the fuel source. Verify that the gas valve on the line leading to the heater is in the open position. If you have other gas appliances in your home, such as a stove or furnace, check if they are working correctly. If none of your gas appliances are functioning, there may be an issue with your local utility provider or a main shut-off valve.

For homes using propane tanks, check the fuel level on the tank gauge. It is easy to overlook a low fuel level, especially during periods of heavy use. If the tank is empty, you will need to schedule a delivery before your hot water can be restored.

Inspecting the Thermocouple

The thermocouple is a small safety device that senses the heat from the pilot light. If it does not detect a flame, it automatically shuts off the gas flow to prevent a dangerous buildup of unburned gas. Over time, these sensors can become covered in soot or simply wear out, leading to frequent pilot light failures.

If your pilot light won’t stay lit despite repeated attempts, the thermocouple is likely the culprit. This is a relatively inexpensive part that can be found at most hardware stores. Replacing it requires some basic tools and a steady hand, but it is a common fix for gas-powered systems.

Solving Electric Water Heater Problems

Circuit Breaker Electric Panel
Foto oleh Jessica Monte di Pexels

Checking the Breaker Box

Electric water heaters rely on high-voltage electricity to power their heating elements. If you experience a sudden loss of hot water, the first thing you should do is check your home’s electrical service panel. Look for a circuit breaker that has tripped to the middle or off position. Water heaters draw a lot of power, and a surge can easily trip the breaker.

If you find a tripped breaker, flip it all the way to the off position and then back to on. If the breaker trips again immediately, do not try to reset it a second time. This indicates a serious electrical fault, such as a short circuit or a grounded element, which requires professional attention to prevent a fire hazard.

Resetting the High Limit Switch

Most electric water heaters have a built-in safety device called a high-limit switch, often referred to as the reset button. This switch is designed to trip if the water temperature inside the tank gets dangerously high. You can usually find this button behind an access panel on the side of the heater, often located near the upper thermostat.

To reset it, turn off the power at the breaker first. Remove the access panel and push the red button. If you hear a click, the switch has been reset. If the switch continues to trip frequently, it could mean that the thermostat is failing or that the water is actually overheating due to a faulty heating element.

Testing Heating Elements

Electric heaters typically have two heating elements: one at the top and one at the bottom. If the upper element fails, you will have no hot water at all. If the lower element fails, you might have some hot water, but it will run out very quickly. These elements can burn out over time due to age or mineral buildup.

A plumber or a handy homeowner can test these elements using a multimeter to check for continuity. If an element shows no continuity, it is broken and must be replaced. This process involves draining the tank and unscrewing the old element, so ensure the power and water are turned off before beginning this task.

Managing Thermostat and Temperature Settings

Adjusting the Temperature Dial

It sounds simple, but sometimes the thermostat dial on the water heater gets bumped or turned down by mistake. For gas heaters, the dial is usually located on the outside of the gas control valve. For electric heaters, the thermostats are hidden behind the access panels on the side of the tank. Ensure the setting is at the recommended temperature.

The standard recommendation for most households is 120 degrees Fahrenheit. This temperature is hot enough for most needs while being safe enough to prevent scalding. If the dial is set too low, the water will feel lukewarm rather than hot, especially during the colder months when the incoming water temperature is lower.

Identifying Faulty Thermostats

If your settings are correct but the water remains cold, the thermostat itself may have failed. In an electric heater, there are usually two thermostats that work in tandem. If the upper thermostat fails, it won’t signal the elements to turn on. In a gas heater, the thermostat is integrated into the gas control valve.

Signs of a bad thermostat include water that is inconsistently heated or water that is dangerously hot regardless of the setting. Replacing a thermostat in an electric unit is a straightforward task, but replacing the control valve on a gas unit is more complex and often requires a professional.

Seasonal Temperature Adjustments

During the winter, the water entering your home from the underground pipes is much colder than it is in the summer. This means your water heater has to work much harder to reach the desired temperature. If you notice a slight dip in performance during cold snaps, you might need to increase the thermostat setting by a few degrees.

Be careful not to set the temperature above 140 degrees, as this increases the risk of accidental burns, particularly for children and the elderly. Additionally, higher temperatures can accelerate the buildup of lime and scale inside your tank, shortening its overall lifespan.

Addressing Sediment and Mineral Buildup

Water Tank Sediment
Foto oleh Haseeb Modi di Unsplash

Recognizing the Sounds of Sediment

If you hear popping, rumbling, or banging noises coming from your water heater, it is a clear sign of sediment buildup. Over time, minerals like calcium and magnesium settle at the bottom of the tank. This layer of sediment acts as an insulator, making it harder for the burner or element to heat the water efficiently.

This buildup can eventually lead to no hot water in house because the heater becomes so inefficient that it cannot keep up with demand. Furthermore, the sediment can trap moisture against the bottom of the tank, leading to premature corrosion and eventual tank failure. Regular maintenance is key to preventing this issue.

How to Flush the Tank

Flushing your water heater once a year is the best way to remove sediment. To do this, turn off the power or gas and the cold water supply. Attach a garden hose to the drain valve at the bottom of the tank and run the other end to a floor drain or outside. Open the drain valve and a hot water faucet elsewhere in the house to allow air in.

Let the water drain until it runs clear. If the water is very cloudy or contains large flakes of mineral, you may need to fill and drain the tank several times. Once finished, close the drain valve, turn the water supply back on, and wait for the tank to fill completely before turning the power or gas back on.

Preventing Future Buildup

If you live in an area with hard water, sediment will accumulate much faster. Installing a water softener for your home can significantly reduce the amount of mineral deposits that enter your water heater. This not only protects your heater but also extends the life of your dishwasher, washing machine, and plumbing fixtures.

Another preventive measure is to check the anode rod every few years. The anode rod is a sacrificial metal rod that attracts corrosive elements, preventing them from eating away at the tank walls. If the rod is completely dissolved, the tank will begin to rust, leading to cloudy water and eventual leaks.

Troubleshooting Tankless Water Heater Systems

Tankless Heater Digital Screen
Foto oleh CHUTTERSNAP di Unsplash

Addressing Power and Error Codes

Tankless water heaters, also known as on-demand heaters, are more complex than traditional tanks. Most units feature a digital display that provides error codes when something goes wrong. If you have no hot water, check the display first. The manual for your specific model will explain what the codes mean, such as an ignition failure or an air intake blockage.

Ensure the unit is plugged in and that the circuit breaker has not tripped. Since tankless units use high-powered burners or large electric elements, they are sensitive to power fluctuations. A simple reset of the unit, performed by turning it off and on again, can sometimes clear minor software glitches.

Cleaning the Intake Filter

Tankless heaters require a steady flow of air for combustion (in gas models) and a clear path for water. Most units have an intake filter that catches debris from the water line. If this filter becomes clogged, the unit will sense the reduced flow and may refuse to ignite as a safety precaution.

Locate the filter, which is usually found near the cold water inlet. Turn off the water, remove the filter, and rinse it under a tap to remove any sand or grit. Keeping this filter clean is an essential part of tankless maintenance that ensures the system can heat water instantly as designed.

Managing High Demand

One common “issue” with tankless heaters is not a mechanical failure but a capacity limit. While they provide endless hot water, they can only heat a certain amount of water at one time. If someone is running the dishwasher, the washing machine, and the shower simultaneously, the unit may struggle to provide hot water to all locations.

If you find the water is cold only when multiple appliances are running, you are likely exceeding the unit’s flow rate capacity. To fix this, try to stagger your hot water usage or consider installing a second unit if your household demand is consistently higher than what your current heater can handle.

When to Call a Professional Plumber

Plumber Tools Maintenance
Foto oleh Quilia di Unsplash

Identifying Major Leaks

While some plumbing tasks are suitable for a weekend DIY project, others require professional expertise. If you see water spraying from a pipe or a large puddle forming rapidly under the tank, turn off the main water valve immediately and call a plumber. A major leak can cause thousands of dollars in property damage in a very short time.

Attempting to patch a leaking tank is usually a temporary and ineffective solution. A professional can assess whether the tank can be repaired or if a full replacement is necessary. They also have the tools to safely handle the heavy lifting and high-pressure connections involved in a new installation.

Dealing with Gas Smells

If you ever smell gas (a scent like rotten eggs) near your water heater, do not attempt to light the pilot or use any electronic devices. Leave the house immediately and call your gas company or the fire department from a safe distance. Gas leaks are extremely dangerous and can lead to explosions or carbon monoxide poisoning.

A professional plumber or gas technician can use specialized sensors to locate the leak and repair the connections. Never take risks with gas lines; it is always better to be safe and have a qualified expert handle any issues involving natural gas or propane systems.

Aging Water Heater Replacement

The average lifespan of a traditional tank water heater is 10 to 15 years. If your unit is approaching this age and you are frequently dealing with no hot water in house, it may be more cost-effective to replace it rather than continue paying for repairs. Newer models are much more energy-efficient and can save you money on your utility bills.

A plumber can help you choose the right size and type of heater for your home’s needs. Whether you want to stick with a traditional tank or upgrade to a high-efficiency tankless system, professional installation ensures that the unit is vented correctly and meets all local building codes for safety.

Conclusion

Experiencing no hot water in house is a major inconvenience, but in many cases, the solution is simpler than it seems. By systematically checking the power source, pilot light, and thermostat settings, you can often identify the culprit without needing a professional right away. Remember that regular maintenance, such as flushing the tank and checking the anode rod, is the best way to prevent these cold surprises from happening in the future.

When troubleshooting, always prioritize safety. Turn off the electricity or gas before performing any internal inspections, and never ignore the smell of gas or signs of a major leak. If you are ever unsure about a repair, it is worth the investment to call a licensed plumber to ensure the job is done correctly and safely. Restoring your hot water not only brings back comfort but also protects the long-term health of your home’s plumbing system.

To keep your system running smoothly, consider these practical tips:

  • Flush your water heater tank at least once a year to remove sediment.
  • Keep the area around your water heater clear of clutter to allow for proper ventilation.
  • Check the temperature setting once a season to ensure it is at a safe and efficient level.
  • Test the Temperature and Pressure (T&P) Relief Valve annually to ensure it is not stuck.
  • Insulate your hot water pipes to reduce heat loss as water travels to your faucets.
Copyright © 2026 AutoPilot Content
error: